
 by
by GitHub · LinkedIn · About · YouTube
Last updated by Kindson Munonye — June 29, 2026
📚 Tutorial hub: Angular tutorials
Source code: GitHub — Spring Boot API · Complete CRUD guide
Part 1 Setup ·
Part 2 GET ·
Part 3 POST ·
Part 4 Details ·
Part 5 Edit ·
Part 6 Delete ·
All Angular tutorials
1. Fetch Data from an API
The HttpClient module is used make a HTTP GET request. To be able to fetch date from an API, you need to follow these steps:
Step 1: Add the HttpClientModule to the app.module.ts file in the imports section. Note that HttpClientModule comes from ‘@angular/common/http’
Step 2: In your friend.compont.ts file, write the Friend class, just after the import statement. The Friend class is shown below:
export class Friend {
  constructor(
    public id: number,
    public firstname: string,
    public lastname: string,
    public department: string,
    public email: string,
    public country: string
  ) {
  }
}
Step 3: In same file, on the FriendComponent class, add friends variable of type Friend[] i.e array of Friend objects.
Step 4: Add HttpClient variable as a parameter to the constructor.
Step 5: Then, write the getFriends function as shown below.
getFriends(){
  this.httpClient.get<any>('http://localhost:8888/friends').subscribe(
    response => {
      console.log(response);
      this.friends = response;
    }
  );
}
Step 6: Finally, call this function on the ngOnInit() method using this.getFriends()
Now you can launch the application. Then open the console and check that the data is actually fetched and displayed in the console.
Cross Origin Error – You may encounter this error, to resolve it, simply add. the @CrossOrigin annotation to the RestController file in the API. By default, the RestController does not allow cross origin access to the methods.
For Node.js API – To fix the CrossOrigin error, you need to first install cors. Then you need to use it in your router or app like so:
var cors = require("cors")
router.use(cors())
2. Display Data in in HTML Table
Now, we are going to display this data in the friend.component.html file. Keep in mind that the friends variable now contain the list retrieved from the API. So we would iterate through this list using ngFor and display each record in HTML table row.
<div class="container">
  <table class="table table-bordered table-striped">
    <thead>
    <tr>
      <th>ID</th>
      <th>Firstname</th>
      <th>Lastname</th>
      <th>Department</th>
      <th>Email</th>
      <th>Country</th>
    </tr>
    </thead>
    <tbody>
    <tr *ngFor="let friend of friends">
      <td><span>{{friend.id}}</span></td>
      <td><span>{{friend.firstname}}</span></td>
      <td><span>{{friend.lastname}}</span></td>
      <td><span>{{friend.department}}</span></td>
      <td><span>{{friend.email}}</span></td>
      <td><span>{{friend.country}}</span></td>
    </tr>
    </tbody>
  </table>
</div>
The code above is quite straightforward, so I’m not going to explain it. Also note that I have enclosed the table inside a div tag. Additionally, see that css classed added to the table tag. Just to make it look nice.
3. Add the Add-New Button
Now we would add all the button needed for Add New, Details, Edit and Delete. Let’s start with Add New. We’ll place this button above the table. Here’s the markup which includes a font-awesome icon
<div class="border">
  <button class="btn btn-md btn-outline-primary">
    <i class="fa fa-user"></i>New Friend</button>
</div>
Then add the style below to the Styles.css. This would add some space around the button.
.border{
  padding: 10px;
}
.btn{
  margin-right: 10px;
}
.fa {
  margin-right: 10px;
}
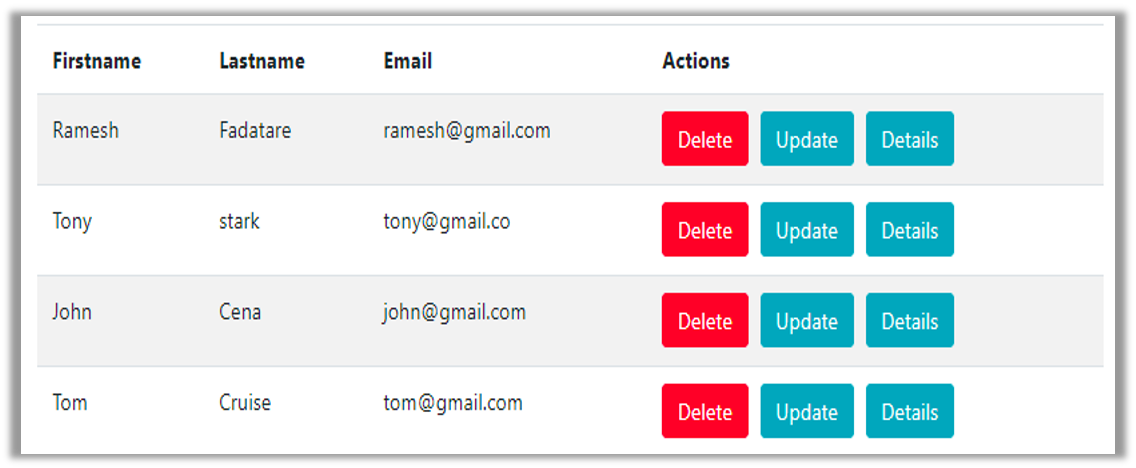
4. Add the Details, Edit and Delete Buttons
You need to create on more column in the table. I will just provide you with the markup for the buttons, then you’ll easily understand it. Add the code below as one more column to the second row of the table
<td>
  <button class="btn btn-sm btn-info">
    <i class="fa fa-search"></i>Details</button>
  <button class="btn btn-sm btn-warning">
    <i class="fa fa-edit"></i>Edit</button>
  <button class="btn btn-sm btn-danger">
    <i class="fa fa-remove"></i>Delete</button>
</td>
Finally add this on more style to kind of reduce the spaced between the icon and the button.
table .btn{
  margin: 2px;
}
You can now launch and view the friends page. If you followed the procedure correctly, this is what you’ll see, else leave me a comment.

5. Next Steps
First, I’ll like to tell you congrats if you have come this far!. However, there’s yet much to be done. If you click on these buttons we added, nothing happens. So in the next part, we would add click events to the buttons. We’ll make them display a modal popup when clicked.
I’ll recommend you subscribe to my Channel on YouTube so when I make the video explanation, you’ll get notified.


[…] to content News: Complete CRUD Operation With Angular 9 Step by Step – PART 2 Complete CRUD Operations with Angular 9 Step by Step – Part 1(Setup) Formatting Date and […]
[…] to content News: Complete CRUD Operation With Angular 9 Step by Step – PART 3 Complete CRUD Operation With Angular 9 Step by Step – PART 2 Complete CRUD Operations with Angular 9 Step by Step – Part […]
[…] Part 2 – In this part, we fetched data from the API and displayed on a HTML table. We also added some control buttons. […]
[…] Part 2 – Fetching JSON Data […]
[…] Part 2 – Display Data in HTML Table […]
[…] CRUD Tutorial Series: Part 1 Setup · Part 2 GET · Part 3 POST · Part 4 Details · Part 5 Edit · Part 6 Delete · All Angular […]
[…] Part 2 → […]
[…] Part 2 – Fetching JSON Data […]